
Why does my wig look fake and how to fix it?
Introduction: Why does a $500 human hair wig sometimes look less natural than a $50 wig?
Have you ever seen someone wearing a wig and thought, “Wow, her hair looks beautiful,” only to discover later that it was actually a wig?
Then, on another day, you put on a high-quality human hair wig, look in the mirror, and immediately notice something feels… off.
The hair may be soft.
The color may be gorgeous.
The price tag may have made you feel like you were investing in something special.
But somehow, it still looks like a wig.
This is one of the most interesting little mysteries in the wig world: why does a more expensive wig sometimes look less natural than a simpler, cheaper one?
The answer usually has very little to do with the price.
A natural-looking wig is not created by simply adding expensive hair fibers to a cap. It is created by dozens of small details working together: the hairline, the lace, the density, the direction of the strands, the way the roots transition, the way the wig sits on your head, and even the way you style the first few inches around your face.
Think about a beautifully decorated room.
You can buy the most expensive sofa in the world, but if the lighting is wrong, the furniture is arranged awkwardly, and the colors do not work together, the room will still feel uncomfortable.
A wig is the same.
The secret is not “more.”
The secret is harmony.
I often think about a conversation I once had with a woman named Sarah, a customer who had purchased a beautiful human hair wig for an important family event. She told me:
“I don’t understand. The wig feels amazing when I touch it, but when I wear it, everyone can tell.”
When we looked carefully at photos, the problem was not the hair quality at all.
The wig was simply too dense at the hairline, the parting looked too perfect, and the crown had too much volume.
Those tiny details were creating a “wig effect.”
And honestly? Many women experience the same thing.
The good news is that most wigs are not “bad.” They are just not customized enough for the person wearing them.
In this guide, we will talk like two friends sitting together with coffee, looking honestly at what makes a wig look artificial — and what you can actually do to fix it.
We will break down:
- The four biggest “wig giveaways” that make people notice a wig.
- Why lace, density, and hair direction matter more than many beginners realize.
- Real examples from wig wearers who transformed their look with small adjustments.
- A step-by-step sequence for making your wig blend naturally.
- Common questions many first-time wig wearers secretly wonder about.
Because wearing a wig should not feel like wearing a costume.
It should feel like yourself — just with a little extra confidence on a good hair day.
The four hidden reasons your wig looks fake
Many people assume an unnatural wig is caused by one obvious problem:
“The hair quality is not good.”
Sometimes that is true.
But after working with wig customers and studying what separates natural-looking wigs from artificial-looking ones, the bigger pattern is much more interesting.
A wig usually looks fake because the eye detects small inconsistencies.
Human brains are surprisingly good at reading hair.
We notice:
- where hair grows from;
- how strands move;
- where density changes;
- how roots transition;
- whether the hairline follows a natural pattern.
Even if someone cannot explain why a wig looks unnatural, their brain is quietly collecting these clues.
Let’s look at the four main areas.
Dimension 1: The hairline looks too perfect
Why an overly straight hairline immediately creates a wig impression
The human hairline is not a ruler.
Real hair does not grow in a perfectly symmetrical line across the forehead.
Look closely at natural hairlines:
- Some baby hairs appear thinner and softer.
- The corners near the temples usually have irregular growth.
- Density gradually increases instead of suddenly starting.
- Individual hairs point in different directions.
A new wig wearer often makes one common mistake:
They place the wig exactly at the front of the forehead and leave the lace untouched.
The result?
A clean, straight edge.
Beautiful craftsmanship.
Perfect construction.
But also slightly artificial.
It is similar to wearing perfectly drawn eyebrows with no variation. They may look pretty, but the eye recognizes the pattern.
A realistic wig needs small imperfections.
That is why experienced wig wearers often customize the hairline.
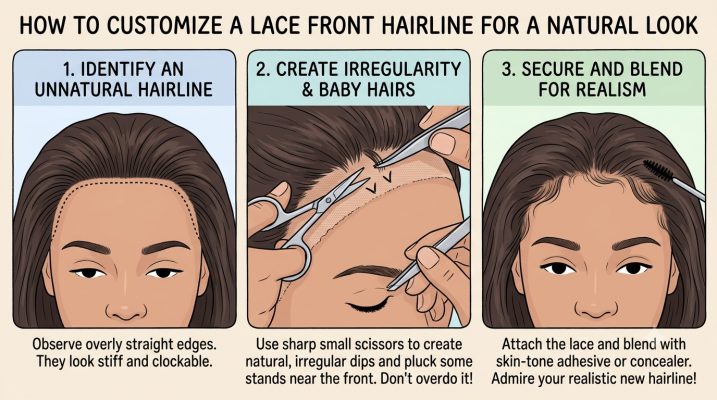
How to soften a wig hairline step by step
Here is the sequence professionals often follow.
Step 1: Check the lace placement
Before cutting anything, wear the wig and examine the front under natural lighting.
Stand near a window if possible.
Ask yourself:
- Does the lace begin exactly where my natural hairline would be?
- Is the wig sitting too far forward?
- Does the hairline look like it starts suddenly?
A common mistake is pulling the wig too low.
Moving it back even 3–5 millimeters can dramatically change the appearance.
Step 2: Create natural baby hairs
Baby hairs should not look like a row of tiny curls glued to the forehead.
They should look accidental.
A realistic approach:
- Pull out a few very thin sections near the front.
- Trim them to different lengths.
- Use a small amount of styling foam.
- Lay them softly along the hairline.
Avoid making every strand identical.
Nature does not repeat patterns.
Step 3: Reduce excessive density around the front
Many beginner-friendly wigs are intentionally made with fuller density because customers like the feeling of “thick hair.”
However, the front area usually needs less density.
If your wig has too much hair near the hairline:
- Use thinning scissors carefully.
- Remove only small sections.
- Focus on the first 1–2 inches behind the lace.
Do not aggressively thin the entire wig.
The goal is not less hair.
The goal is a natural transition.
Dimension 2: The wig density does not match your face
Why “more hair” is not always more beautiful
One of the biggest surprises for new wig buyers is this:
A very full wig can sometimes look less realistic than a medium-density wig.
Why?
Because natural hair has balance.
The average person does not have the same thickness from root to ends.
Real hair usually has:
- lighter density around the hairline;
- moderate fullness around the crown;
- more movement toward the ends.
A wig with identical thickness everywhere can create a helmet-like shape.
I like to compare it to eyelashes.
A few well-placed lashes look natural.
A thick, perfectly even row of lashes looks obviously artificial.
Hair works the same way.
How to choose the right wig density for your features
A good density depends on:
Face shape
Round faces often benefit from:
- softer layers;
- moderate volume at the crown;
- less width around cheeks.
Longer faces may work well with:
- more side volume;
- waves;
- fuller textures.
Age and lifestyle
A very dense 180% or 200% density wig may look glamorous for photos or performances.
But for everyday wear, many people prefer:
- 120%;
- 130%;
- 150%.
These densities move more naturally.
Hair texture
Straight hair reflects light differently from curly hair.
A straight wig with excessive density can look heavier because the strands fall together in large sections.
Curly and wavy textures naturally create more visual separation, so higher density may appear softer.
For shoppers looking for different density options and textures, exploring a properly categorized collection can make the selection process easier. For example, the human hair wig collection at MsAloe includes different styles designed around different wearing preferences rather than a single “one-size-fits-all” look .
13×6 Lace Front Human Hair Wig
Ms Aloe provides the 13×6 lace front wigs,Whether you like body wave lace front wigs 13*6,curly human hair 13 by 6 lace front wigs,wet and wavy lace front wigs for black women,you can find your perfect fit and style at Ms Aloe.
Dimension 3: The wig parting looks unnatural
Why the scalp area is where many wigs reveal themselves
Imagine looking at someone from across a room.
You probably do not first notice the ends of their hair.
You notice the area around their face.
The part line.
The roots.
The scalp transition.
This is where many wigs struggle.
A realistic scalp area needs three things:
- Correct color matching.
- Natural irregularity.
- Proper hair direction.
Many factory-made wigs have a part that is too clean.
The line is straight.
The density is identical.
The strands all travel in the same direction.
Real scalp areas are much messier.
That messiness is what creates realism.
How to make a wig part look more natural
Method 1: Add slight root variation
If the wig part looks too bright or too empty:
Use a root powder or eyeshadow close to your natural scalp tone.
Apply lightly.
The goal is not to darken everything.
The goal is to remove the “newly manufactured” appearance.
Method 2: Change the part direction
Many wigs come with a center part because it fits the largest number of customers.
But your natural part may be different.
Try:
- slightly off-center;
- side part;
- soft zigzag part.
A small change can make the wig appear customized.
Method 3: Train the hair direction
Human hair wigs can often be restyled.
After washing:
- Place the wig on a mannequin head.
- Create your desired part.
- Blow dry using low heat.
- Allow the hair to cool while holding the shape.
Hair remembers movement.
This simple step can make a factory style feel much more personal.
Dimension 4: The color and texture look too “perfect”
Why perfectly colored hair can sometimes look less real
This is one of those funny things about human perception.
We often think perfection equals beauty.
But when it comes to hair, perfection can sometimes create distance.
Natural hair almost always has variation.
Even someone with “black hair” rarely has one single shade from root to tip.
Under sunlight, you might notice:
- slightly warmer brown areas;
- softer faded ends;
- subtle differences between strands;
- small changes caused by years of sun exposure.
A wig with completely identical color from root to end can look like a painted surface.
The same applies to texture.
A perfectly uniform wave pattern may look beautiful in a product photo, but in daily life, hair moves differently.
Some strands separate.
Some waves loosen.
Some pieces fall forward.
That small amount of randomness is what makes hair feel alive.
The science behind natural-looking wig color transitions
Professional colorists do not create realism by adding more color.
They create realism through transition.
For example, a natural-looking blonde wig often has:
- darker roots;
- gradual mid-length blending;
- softer blonde ends.
This is why techniques such as shadow roots, balayage, and dimensional coloring became popular.
The eye expects gradual change.
A sudden color jump creates the feeling of a manufactured object.
How to fix a wig color that looks too artificial
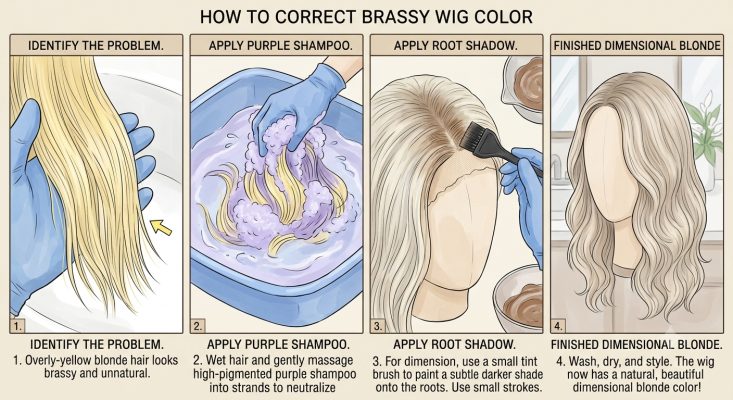
Solution 1: Add root depth
If your wig is too bright at the roots:
You can create a shadow-root effect.
Professional colorists usually use demi-permanent color because it is gentler than permanent dye.
For human hair wigs:
- Use a shade 1–2 levels darker than the wig base.
- Apply only around the first 1–2 inches of the roots.
- Blend downward with a brush.
- Avoid creating a harsh line.
The goal is a soft transition.
Not a visible “dark root.”
Solution 2: Correct unwanted yellow tones in blonde wigs
Many blonde wig owners experience this after washing.
The hair may slowly become warmer or slightly yellow.
This happens because:
- minerals in water;
- product buildup;
- UV exposure;
- oxidation.
A purple shampoo can help because purple sits opposite yellow on the color wheel.
A careful routine:
- Wet the wig with cool or lukewarm water.
- Apply purple shampoo mainly to blonde areas.
- Leave it for around 1–5 minutes depending on the intensity.
- Rinse thoroughly.
- Follow with a moisturizing conditioner.
Do not leave purple shampoo too long.
Overuse can create a gray or lavender tone.
Solution 3: Restore natural movement
Sometimes a wig looks fake simply because it is too styled.
Try:
- separating curls gently with fingers;
- adding lightweight leave-in conditioner;
- using low-temperature heat styling;
- avoiding heavy silicone-based products.
Hair should move.
It should not look frozen.
Core Case Analysis: Two real wig transformation stories
The most useful lessons often come from real people.
Because every wig problem looks slightly different when it is sitting on an actual person’s head.
Here are two examples based on common situations experienced by wig wearers.
Case Study 1: Sarah’s $600 human hair wig that looked “too obvious”
Sarah was 42 when she purchased her first premium human hair wig.
She had always worn her natural hair short, but she wanted a longer style for a wedding celebration.
She chose:
- 100% human hair;
- 20-inch length;
- lace front;
- medium brown color.
When the wig arrived, she loved the softness.
The hair moved beautifully.
The problem appeared when she looked at herself in photos.
She said:
“The wig looks expensive, but it doesn’t look like me.”
At first, she thought the problem was the wig itself.
But after analyzing the photos, we found four small issues.
Problem 1: The wig was placed too close to the eyebrows
Sarah had positioned the wig lower because she wanted to hide all of her natural hair.
However, moving the wig forward changed her facial proportions.
The hairline became too symmetrical.
Fix:
She moved the wig back approximately 5 millimeters.
That tiny adjustment allowed her forehead shape and facial features to look more balanced.
Problem 2: The front density was too thick
The wig had beautiful volume, but the first inch near the lace was very full.
The result looked like hair was sitting on top of her forehead instead of growing from it.
Fix:
A stylist carefully removed small amounts of density near the front.
Not a dramatic thinning.
Just enough to create graduation.
Problem 3: The part was too perfect
The middle part was completely straight.
Human scalps rarely create such a perfect line.
Fix:
The stylist slightly shifted the part and added subtle root shading.
The wig immediately looked more personalized.
Problem 4: The texture needed less “new wig” styling
The curls were beautiful but too uniform.
Every curl had the same shape.
Fix:
The stylist brushed through the curls lightly with fingers and added a small amount of texture spray.
The hair became softer and more natural.
After these changes, Sarah’s biggest comment was not:
“Everyone loved my wig.”
Instead, she said:
“Nobody asked if it was a wig. They just told me my hair looked good.”
That is usually the real goal.
Not hiding something.
Just feeling comfortable.
Case Study 2: Emma’s blonde wig that looked like a costume
Emma loved blonde hair.
She purchased a platinum blonde lace wig because she admired celebrity-inspired hairstyles.
The color was beautiful online.
But after wearing it, she felt uncomfortable.
She described it as:
“It feels like the hair belongs to someone else.”
The issue was not the blonde color itself.
The issue was the contrast.
The first problem: The roots were too bright
Natural blonde hair usually has dimension.
The wig had the same platinum shade from root to end.
This created a “helmet” effect.
Fix:
A stylist created a soft shadow root.
The process:
- Choose a neutral blonde-brown shade.
- Mix according to the manufacturer’s instructions.
- Apply carefully only around the root area.
- Feather the color downward.
- Rinse and condition.
The result was a softer transition.
The second problem: The lace color did not match
The lace was slightly lighter than Emma’s skin tone.
Even high-quality lace becomes noticeable if the color contrast is wrong.
Fix:
The lace was tinted using a shade closer to her complexion.
The important thing is subtlety.
Lace should disappear visually.
It should not become another visible layer.
The third problem: Too much volume at the crown
The wig had a dramatic salon blowout shape.
Beautiful for photography.
Less natural for daily life.
Fix:
The crown was gently flattened using controlled heat.
For human hair wigs:
- Use a heat protectant first.
- Use a flat iron around 250°F–300°F depending on hair condition.
- Avoid repeated high heat.
- Allow the hair to cool after shaping.
Heat should guide the hair.
Not damage it.
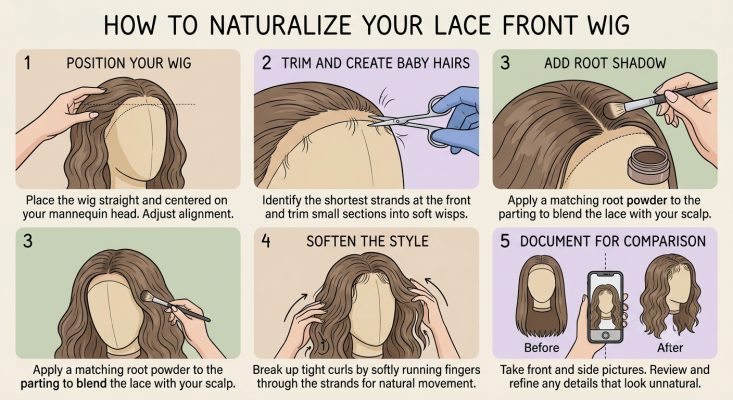
The complete wig naturalization sequence: A professional step-by-step method
Many people try random fixes.
They cut baby hairs.
Then they dye roots.
Then they change styling.
But without a sequence, it is easy to create more problems.
Here is a more logical order.
Step 1: Correct the foundation before styling
Before touching the hair:
Check:
- wig size;
- wig placement;
- lace position;
- ear-to-ear alignment.
A perfectly styled wig will still look unnatural if it is sitting incorrectly.
Make sure:
- the front is not too low;
- the wig is secure;
- the part sits where your face looks balanced.
Step 2: Customize the hairline
Only after placement is correct:
Adjust:
- baby hairs;
- front density;
- lace blending.
Tools often used:
- small scissors;
- tweezers;
- edge brush;
- lace tint products.
Work slowly.
Removing hair is permanent.
Adding hair back is impossible.
Step 3: Match the scalp appearance
Focus on the part and lace area.
Possible adjustments:
- root powder;
- lace tint;
- changing the part;
- lightly plucking excessive density.
A realistic scalp is not completely empty.
It has soft shadow and irregularity.
Step 4: Adjust texture and movement
Now style.
For human hair wigs:
- wash gently;
- apply conditioner mainly to mid-length and ends;
- air dry when possible;
- use low heat.
Avoid making every strand behave perfectly.
Natural hair has personality.
Step 5: Photograph yourself before final adjustments
This is a trick many professionals use.
A mirror can hide certain problems.
Photos reveal them.
Take pictures:
- front view;
- side view;
- outdoor lighting;
- indoor lighting.
Look for:
- straight hairline;
- excessive shine;
- unnatural volume;
- visible lace.
For beginners who want a wig designed with realistic construction details such as natural parting and wearable density, styles like the MsAloe human hair lace front wigs can provide a practical starting point for customization .
The friend-to-friend method: How to keep your wig looking like your hair
After helping many wig wearers troubleshoot their concerns, I have noticed something interesting.
Most people are not actually trying to make their wig look “perfect.”
They are trying to make it disappear into their everyday life.
They want to go grocery shopping without thinking about whether someone is looking at their hair.
They want to take photos with friends without checking the angle of the lace.
They want to walk into a room and have people notice their smile, their outfit, their personality — not the fact that they are wearing a wig.
And that feeling usually comes from small habits.
A natural wig is not created in one dramatic makeover moment.
It is created through gentle adjustments over time.
Think of your wig like a favorite sweater.
The first day you wear it, it may feel slightly unfamiliar.
After washing it, shaping it, and wearing it, it begins to feel like yours.
Hair works the same way.
The five habits of people whose wigs always look natural
Habit 1: They spend more time on the first three inches than the last twenty inches
This is probably the biggest lesson in wig styling.
Many beginners focus on:
- length;
- curls;
- color;
- shine.
Of course, these things matter.
But the area people notice first is usually:
The hairline.
The part.
The roots.
The area around the face.
A 24-inch wig with an unnatural front will still look like a wig.
A 16-inch wig with a beautifully blended hairline can look completely believable.
The first three inches tell the story.
They tell the eye:
“Is this hair growing naturally?”
or
“Is this hair attached?”
That is why professional wig customization often begins at the front.
Habit 2: They do not wash their wig like natural hair
This is a small detail that changes everything.
A wig does not receive natural oils from your scalp.
That means it does not need the same washing schedule as biological hair.
Overwashing can make human hair wigs:
- dry;
- frizzy;
- less flexible;
- harder to style.
A gentle routine usually works better.
A simple human hair wig washing sequence:
Step 1: Detangle before washing
Use a wide-tooth comb.
Start from the ends.
Slowly move upward.
Never pull from the roots first.
The hair knots most easily near the ends because those areas have experienced the most friction.
Step 2: Use lukewarm water
Very hot water can open the cuticle too aggressively.
This may increase dryness.
Lukewarm water is usually enough.
Step 3: Shampoo carefully
Apply shampoo mainly to the cap and hair surface.
Do not create aggressive rubbing motions.
Imagine washing a delicate silk blouse.
The movement should be gentle.
Step 4: Condition correctly
Conditioner should focus on:
- middle lengths;
- ends.
Avoid applying heavy conditioner directly onto lace knots.
Too much product near the roots may affect the appearance of the hairline.
Step 5: Dry patiently
Avoid twisting the wig like a towel.
Instead:
- press gently with a microfiber towel;
- place it on a wig stand;
- allow natural airflow.
A little patience protects the hair movement.
Habit 3: They understand shine is not always healthy-looking
One of the most misunderstood wig problems is excessive shine.
People often think:
“More shine means better hair.”
But natural human hair has soft reflection.
Synthetic-looking shine is usually:
- very bright;
- uniform;
- reflective under every light.
Healthy hair has variation.
Some areas catch light.
Some areas do not.
If your wig looks too shiny:
Try:
- washing away product buildup;
- using lightweight dry shampoo;
- avoiding heavy oils;
- gently separating strands.
The goal is soft movement, not a plastic-like reflection.
Habit 4: They choose styles that match their lifestyle
A common mistake is choosing a wig based only on fantasy.
Someone may love a dramatic celebrity hairstyle online.
But their everyday life may require something completely different.
Ask yourself:
Where will I wear this wig?
A natural everyday wig often benefits from:
- comfortable density;
- easy maintenance;
- realistic movement;
- a style that fits your personality.
A beautiful wig is not only one that looks good in a photo.
It is one that feels easy to live with.
Habit 5: They accept that customization is normal
This is worth saying clearly:
A wig is not always supposed to arrive perfect.
Even expensive wigs often need personal adjustment.
Why?
Because every person has:
- different forehead shapes;
- different skin tones;
- different face proportions;
- different styling preferences.
A wig straight out of the box is like a pair of jeans before tailoring.
The quality may be excellent.
But a small adjustment makes it belong to you.
Frequently Asked Questions: Real answers to common wig worries
Why does my expensive human hair wig still look fake?
A high price does not automatically guarantee a natural appearance.
The main factors are:
- correct placement;
- hairline customization;
- density balance;
- color transition;
- styling technique.
A premium wig with poor customization may look less natural than a more affordable wig that has been adjusted carefully.
Should I pluck my lace front wig immediately after receiving it?
Not always.
First, wear it several times.
Understand how the density looks on your face.
Many people over-pluck because they compare their wig to highly edited online photos.
Start slowly.
Remove small amounts.
You can always remove more later.
You cannot easily put hair back.
How many baby hairs should a natural wig have?
Usually fewer than beginners expect.
A common mistake is creating a thick row of baby hairs.
Real baby hairs are:
- fine;
- irregular;
- different lengths;
- softly distributed.
Think “soft detail,” not “decoration.”
Why does my lace look visible even though the wig is high quality?
The lace itself may not be the problem.
Possible reasons include:
- wrong lace color;
- incorrect placement;
- too much adhesive;
- lighting differences;
- insufficient blending.
A good lace should visually disappear into the skin.
Can I dye a human hair wig darker?
Yes, human hair wigs can usually be colored darker.
However, the process should be approached carefully.
Going darker is generally easier than going lighter.
Darkening usually involves adding pigment.
Lightening requires removing pigment, which can weaken hair.
If coloring:
- perform a strand test first;
- avoid repeated chemical processing;
- use moisturizing treatments afterward.
How do I fix a blonde wig that turns yellow?
A purple shampoo routine can help neutralize yellow tones.
A general approach:
- Wet the wig with cool water.
- Apply purple shampoo evenly.
- Leave briefly according to the product strength.
- Rinse completely.
- Condition afterward.
Do not overuse purple shampoo because excessive violet pigment may affect the blonde shade.
Why does my wig feel too heavy?
The issue may be density.
Many beginners choose higher density because they want fullness.
However, everyday realism often comes from balance.
Consider:
- medium density;
- layered cuts;
- lighter styling around the face.
Can heat styling damage a human hair wig?
Yes.
Even though human hair wigs can be styled with heat, they are not connected to a living scalp.
They cannot repair themselves.
Use:
- heat protectant;
- lower temperatures;
- fewer repeated passes.
For straightening, many stylists stay around 250°F–300°F depending on the hair condition.
For curling, avoid holding heat too long in one section.
How often should I replace my wig?
There is no single answer.
A wig’s lifespan depends on:
- construction;
- maintenance;
- frequency of wear;
- styling habits.
A carefully maintained human hair wig can last significantly longer than one exposed to frequent heat, harsh products, or rough handling.
What is the easiest wig style for beginners?
Many beginners feel comfortable with:
- medium-density lace front wigs;
- natural colors;
- soft waves;
- manageable lengths.
A style that requires less daily adjustment often creates more confidence.
A final note from one wig lover to another
If your wig does not look natural right away, do not assume you chose the wrong one.
Sometimes the wig is not the problem.
Sometimes it simply needs to meet you halfway.
The most beautiful wigs are not the ones that make people think:
“Wow, what an amazing wig.”
They are the ones that make people think:
“You look great today.”
There is a quiet confidence that comes from finding a hairstyle that feels comfortable, familiar, and personal.
A wig should support your expression.
It should not become something you constantly worry about.
Small details create realism:
A softer hairline.
A more natural part.
A little less perfection.
A little more movement.
That is usually where the magic happens.
If you are interested in learning more about selecting, wearing, and caring for wigs, you can also explore practical guides such as MsAloe’s educational article about achieving a more natural wig appearance (https://www.msaloe.com/blogs/news/how-to-make-a-wig-look-natural).
And if you are choosing your first human hair style, focusing on construction details such as lace type, density, and texture will often make a bigger difference than simply choosing the longest or fullest option. For example, natural everyday styles like the MsAloe 13×4 lace front human hair wigs can provide a flexible base for beginners who want room for customization (https://www.msaloe.com/products/13×4-lace-front-human-hair-wig).
Your personal wig checklist before stepping outside
Before leaving home, ask yourself:
Hairline
Does the lace blend with my skin?
Are the baby hairs soft and irregular?
Does the hair appear to grow naturally?
Parting
Is the part too straight?
Does the scalp area have natural depth?
Density
Is there too much volume around my face?
Does the thickness match my personal style?
Texture
Does the hair move naturally?
Is there too much product buildup?
Confidence
Do I feel comfortable wearing it?
Because the final test is not the mirror.
It is how easily you forget you are wearing it.
And that is usually when a wig becomes truly yours.
